HomeWish ListLive Support
Shopping Basket - £0.00

You have no items in your shopping basket.

Blog:Proleno

  • How to Bend Wood

    Bending wood is not the daunting task that it appears to be at first glance. Depending on the degree of bend, and whether or not the bend is compound, there are a couple of methods for bending wood.

    curves-patio-furnitureFirst, you need to have a form to bend your wood around and clamp to to hold thedesired shape. Most bent wood will have a certain degree of "springback", so you must build your form with an allowance for this. And, unfortunately, there is no established formula for determining the degree of springback that a given species of wood will produce. Springback is also influenced by the bending method used. That is to say that steamed wood will spring, or "unbend" more than wood that is laminated and glued. Another variable is the type of glue used in laminating.

    As a general rule, the tighter the bend, the more the wood will spring back, making the allowance a matter of trial and error at best.

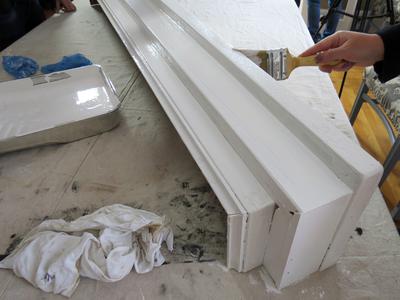
    As laminating thin strips is the easiest method, we'll begin with that process. The finished thickness of the project will have a direct bearing on the size of the strips to be used, but generally, the heaviest strip to use is about ¼" thick. Tight bends may have to be done with 1/8" strips or thinner, depending on the wood species. Sounds like a lot of experimenting, but I'm afraid that's a necessary evil.

    bend-woodThe form required for laminating can be as simple as a piece of pipe or as complex as a multi-station die. I like to keep things as simple as possible.

    When laminating thin strips, you can minimize effort and spring back by soaking the strips before bending, and clamping them in the mold without gluing. Once they are dry, remove them from the mold, spread the glue and re-clamp them in the mold. Line the mold with waxed paper to prevent the lamination from sticking to the mold.

    When I soak strips, I do so in an open container, and depending on the wood and the size of the strips, I soak them from 15 minutes to overnight. I also mix in a half cup of fabric softener per gallon of water. I find that it softens wood nearly as well as fabric.

    If the project is small, and open time on the glue is not a factor, I'll use poly-vinyl-acetate, or aliphatic resin glue. If I need more working time, I'll use epoxy or resorcinol. I stay
    away from the quick setting epoxies, however, because they rarely harden to the extent that the slow sets do. If you're using light colored wood, resorcinol dries to a reddish color which might be objectionable on a finished project.

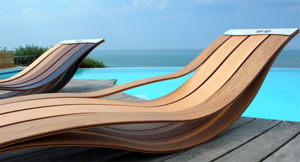
    When bending thin woods such as guitar sides, the wood is commonly soaked as above, but it is bent over a hot bending jig, either electric, or heated with a propane torch. Brittle woods are supported on the outside of the bend with a thin stainless steel band to help prevent cracking. Green woods can be bent much in the same way, or by heating the wood over hot coals or with a good heat gun.

    For projects where lamination is objectionable, or when the wood is to be bent in compound curves, a steam box is the answer. One can be made fairly economically from PVC pipe, but it needs to be supported to keep the pipe from deforming.

    The ends of the pipe need to be closed with a screw cap on at least one end, to allow access to the interior. Fit the other end of the pipe with a DWV reducing tee, and attach a radiator hose to the side outlet and to a new gas can large enough to hold sufficient water to last through the job. The water may be heated with a hot plate or a propane burner.

    Drill through the pipe slightly below center in two or three locations and insert dowels for the wood to rest on. Steam must be allowed to circulate freely around the wood for even penetration. A hole about ½" in diameter should be drilled in the cap furthest from the steam inlet to allow circulation. When you build the support frame for the steam box, pitch the box toward the steam inlet to allow the condensation to return to the water supply.

    Rule of thumb says that wood should be steamed fifteen minutes per inch of thickness, but here again, some experimenting will be necessary.

    The wood needs to be placed into the form as quickly as possible, because as the wood cools, it is more difficult to bend. Make sure that your wood is at least two feet longer than the finished part, because it's nearly impossible to bend a 3/4" piece of wood that is less than a foot long, so that last foot will have to be cut off after the wood is dry.

    Clamp the wood in the form securely, and leave it there until it is completely cool. If you are working with multiple pieces, place them in the steam box a approximately the interval required to place the piece in the form and clamp it, and remove them from the box in the same order.

    With a little practice and a little luck, it shouldn't take long to become proficient in wood bending. Good luck with your project, and if I can be of any help or answer any questions, feel
    free to respond to this post, or email me at campbell5017@bellsouth.net .

    To get the e-book "How To Bend Wood" as well as other e-books I have written on various aspects of woodworking, click here.

    Grant Campbell. Grant has been a professional woodworker for over 50 years. He would like to pass on some of his favourite tips and techniques through his articles

  • Arranging Furniture after a Move

    furniture-movingAfter arriving in your new home, it takes some time before you can settle in and adjust to the surroundings. Arranging furniture is perhaps one of the most grueling tasks after the moving company delivers the pieces. Be ready to rearrange, get rid of pieces that don't fit and perhaps purchase new items that might work a little better.

    Some furniture arrangement tips have been outlined for you. Take a look:

    • Remove packing boxes or scattered furniture from the room as you will not be able to visualize how you want the space to look like. The room needs to be ascetically pleasing and functional too. Determine how the space will be used – if possible, plot the details on paper.

    • For rooms that will serve more than one purpose, furniture, rugs, bookshelves and room dividers can be used to separate areas. The back of a couch along with a sofa table can make a great room divider as it creates a strong separation without blocking the room's flow.

    • Make sure you know about the proper dimensions of the furniture so that you can decide which piece will be placed at what angle. Movers and packers can help you out in this regard as they need to take measurements of all the pieces that are being moved.

    • All pieces should be placed against walls because the middle of the space should also be utilized creatively for depth and interest. Remember the traffic flow – most traffic areas need only two feet of space.

    • Balance heavy furniture pieces with other large objects or groupings of smaller items. Look at the height of furniture pieces and try to create multi-levels within the space. If you have a shorter piece and need to add height, hang a larger print on the wall above, elongating the space and allowing the eye to travel up; this will make the room feel taller.

    • Keep color patterns in mind while arranging furniture. Eye-catching colours are fine because the room seems vibrant but it is important not to use one particular color or pattern too much throughout one space.

    • Arrange major pieces of furniture first, then smaller items such as end tables, chairs and plant stands. Leave enough room for doors and drawers to be opened.

    • Make sure that the arrangement doesn't block the lighting in the room and maintain distance-parameters when needed. For instance, while placing a TV cabinet in a room, sofas or beds should be placed at a minimum of 8 feet away from the screen.

    • All furniture-related tasks should be completed before you start working on paintings, mirrors, etc.

    Jack Watson - Jack is author for US based E-zmover.

  • How To Paint A Brick Fireplace

    Learn how to transform an old fireplace with new paint and molding.

    We brought an old fireplace back to life with a little elbow grease, a couple coats of paint and new mantel (materials found at a salvage shop). It was cheap, easy and the results are stunning.

    CI-Susan-Teare_Brick-FireplTools and Materials
    wire brush
    screwdriver
    tape measure
    chop saw (optional, if extra wood is added to mantel)
    studfinder
    simple recycled mantel (to slip over the old stone mantel)
    (2) salvaged boards (optional for larger mantel)
    4 to 8 long screws
    paintbrush and painter's tape
    white paint for mantel (eggshell, latex)
    paint for brick (eggshell, latex)
    black heat resistant paint for firebox
    sandpaper
    wood glue
    wood filler
    water/white vinegar spray
    rags
    shop vacuum

    Here's what the fireplace looked like before:
    Original-Brick-Fireplace_Before_s4x3_lg

    Scrub the Brick
    Lay down a drop cloth to make clean up easier. Use a wire brush to get all the dust and sot off the brick fireplace. Vacuum the entire area.
    Original-Brick-Fireplace_Scrubbing-Brick_s3x4_lead

    Wash the Brick
    Spray the fireplace brick with a 50/50 mixture of water and vinegar then use a rag to clean off any residue so the paint and adhesives can stick.
    Original-Brick-Fireplace_Spray-Vinegar_s3x4_lead

    Paint the Inside
    Paint the inside the firebox area with special heat-resistance paint. Apply two coats if necessary.
    Original-Brick-Fireplace_Painting-Inside-Box_s4x3_lead

    Paint the Brick
    Paint the rest of the brick with your paint color. Brick is porous, so make sure to push the paint into the brick so there are no pinprick holes showing. Apply a second coat if necessary.
    Original-Brick-Fireplace_Painting-Brick_s3x4_lead

    Build a New Mantel
    Measure the current mantel top and plan a design. We got lucky and found a simple mantel at a recycle center that will slip over our existing mantel. We added molding to the newly found mantel to give it more interest. We attached the molding with wood screws, covered the holes, then sanded and painted the entire mantel.
    Original-Brick-Fireplace_Mantel-at-Resale-Shop_s3x4_lead
    Original-Brick-Fireplace_Mantel-With-New-Molding_s4x3_lead
    Original-Brick-Fireplace_Painting-Mantel_s4x3_lead

    Install the Mantel
    Place the mantel over the top of the old mantel. Find the studs in the wall, they should be just at the edge of the fireplace. Toe-nail the screws into the mantel through the wall.

    Fill the screw holes with wood filler, let dry, sand and then paint to match the mantel.

    Joanne Palmisano - Joanne is the author of Salvage Secrets

  • Stylish Nespresso® Capsule Holder

    20213ZACK CURO capsule holder

    Stylish capsule holder for up to 18 Nespresso® capsules.

    The elegantly finished holder is made of brushed satin 18/10 stainless steel and a contrasting black plastic inlay. The holder safely stores the Nespresso® capsules on both sides and can be rotated freely on the base, ensuring that you always make the right coffee choice.

    The bottom capsule can be removed easily by pulling lightly. The other capsules move down and remained fixed in position until the next capsule is removed.

    20214This stylish capsule holder is also available as a wall mounted version. The bottom capsule can be removed easily by pulling lightly. The other capsules move down and remained fixed in position until the next capsule is removed.

    Available to order right now at Proleno

  • Drill Or Glue? Secure Adhesive For Bathroom Accessories

    ZACK adhesive set ZACK MOUNT

    zack_mount_logoZackMount is ideal for attaching wall mounted itens without having to drill holes and is suitable for many different products on stable, rough and smooth surfaces, both indoors and outdoors. It is now no longer necessary to drill through your valuable tiles. The answer is adhesive. And, when you want to remove the mount in question, this can be done quite simply and without leaving any traces.

    zack-mountNumerous bathroom products from ZACK are already prepared for this progressive mounting method. They are identified by the red ZackMount emblem on the packaging.

    The adhesive is provided in two packaging sizes (6g / 13g) and is sufficient for 2 and 4 mounting plates respectively.

    As always, available now from Proleno!

  • 12 Ways to Upgrade Your Bathroom

    Easy ideas that will take a bath from chaos and clutter to simple and serene.

    1. Old wooden crates make smart holders for extra toilet paper and rolled bath towels.
    2. Turn an unused nightstand into storage for small towels, makeup, hair tools, and toiletries.
    3. A sink skirt hides a multitude of sins. You can easily make a no-sew one from a pretty bedsheet.
    bath-towels_3004. When your bath lacks wide ledges where you can stow your bath products, hang a multilevel fruit basket for additional space.
    5. A shelf rack with hooks is an ingenious answer to the storage problem posed by smaller spaces.
    6. Separate cosmetics by category―lip colours, shadows, blushes, etc.―and store them in small drawer organisers that you can easily rearrange.
    7. Make a long soak even more luxurious with bath salts, lush towels, and aromatic candles within easy reach.
    8. Think of an unused sugar bowl as a decorative container, perfect for cotton balls and Q-tips.
    9. Something as simple as an over-the-bath wire rack devoted to bathing goods adds a nice touch (and extra convenience).
    10. It is possible to keep toiletries looking neat on a bathroom countertop, with the aid of odds and ends like unused, mismatched serving pieces.
    11. A woven basket holds an ample supply of toilet paper, eliminating the need to hunt when you’re down to the end of a roll (your guests will thank you).
    12. A retractable mirror is a practical solution on walls that won’t allow for a conventional mirror.

    Ideas from Real Simple

  • Timeless Design in an Exclusive Mirror Finish

    ZACK SCALA hairdryer holder

    This exquisitely finished hairdryer holder is made of high-gloss 18/10 stainless steel. This practical bathroom accessory impresses with its typically exclusive ZACK finish which lends the design article its unmistakable appearance.scala-hairdryer-holder

    The clear forms and the consistently timeless clear-cut design language through which the SCALA range fits harmoniously into a wide variety of bathroom worlds are the outstanding characteristics of this modern bathroom series.

    The inside of the holder ring is fitted with a soft rubber lining to prevent the hairdryer from becoming scratched.

    When it comes to wall mounting of the SCALA range you can choose between traditional drill fitting and modern adhesive fitting using the special adhesive ZackMount.

    ZackMount is ideally suited for stable wall mounting without drill holes on almost all load-bearing, rough and smooth surfaces both indoors and outdoors. ZackMount can be removed from all surfaces without leaving any traces.

  • 3 Most Wanted Moroccan Interior Design Elements For Home Décor

    Casbah Decor

    When it comes to home décor, there is no scarcity of interior design objects in the modern world. However, when it comes to unique interior design objects, they can be rare to find and obviously will be very costly. Thankfully, there is a group of interior design elements which are unique and are very affordably priced. Moroccan styled interior design is fast becoming a great trend worldwide. Moroccan interior design has gained huge popularity since the renovation of the Riad traditional Moroccan house. You can bring the marvels of the Moroccan interior design to your home by wisely choosing the home décor elements.

    moroccan-theme-decorThe Moroccan Furniture

    According to expert interior designers, home décor without unique furniture will be incomplete. One of the main advantages of using Moroccan furniture in home décor is it offers great functionality combined with unique looks. The problem associated with most modern furniture is that they will have unique style but most of them will have zero usability. This disadvantage is overcome by the use of Moroccan furniture. Moroccan furniture gives great value for money. According to real estate experts, homes decorated with Moroccan furniture will have great face value when compared to others.

    The Moroccan Lighting

    Lighting is a critical part of home décor because proper lighting will greatly increase the beauty of the room. You will be well aware that ambient soothing lighting will make any home look peaceful and calm. This is where Moroccan lighting comes into play. You’d have noted that Moroccan home décor will enhance peacefulness. This is made possible with the help of the lighting effects cast by Moroccan lighting fixtures.

    Decorating The Bedroom

    When it comes to Moroccan home décor, the opportunities to decorate the bedrooms are unlimited. You can apply both Moroccan lighting and place some unique Moroccan furniture in your bedroom to make the room look beautiful and unique. To add to the beauty of the bed rooms, you can throw in some Moroccan lamps which are cheap.

    Bottom Line

    If you are looking for unique interior design objects, the Moroccan ones are made for you. Head out to a Moroccan home décor store and see the vibrancy by yourself.

  • Tips For Moving With Children

    movingMoving from one place to another; be it a long distance or to the next street, is so stressful and if it is with children it is even more stressful so. You will be having lots of things running through your mind, from finalising the new house, choosing a removal company, things to pack, what to give away, donate or leave. In this situation, children are also going through a lot of stress as they feel scared and excited at the same time. They are frustrated to be leaving their friends in the neighbourhood as well as at school. They are scared about how they will adjust to the new environment and excited to meet and make new friends. Their stress, added to your stress, makes you more stressed.

    To make these things easier to deal with think of some ways that will help you with sorting out these things step by step using some sort of a moving checklist. There are a few tips and tricks to make this experience happen in a smoother way. Here is how to do that:

    Communication

    First thing to do is to sit down and explain to all the family members, especially the kids about the move. Explain why this move is so important, where you are going to move and when. Make them understand that this move is for a good purpose and they will have more advantages in the area where they are going to move than what they have now.

    Get the kids engaged

    Make sure you engage the kids as well in this moving process. Take them along with you for the new house hunt. Help them pack their own clothes along with things that will make them feel responsible. Have them design their own room, such as where to put their furniture and allow them to choose the colour for their room. When children feel that their opinions are valued in a big life change, it will help them to relax and become even more comfortable and confident with moving to a new environment.

    Organise a goodbye party

    Along with the children, organise a farewell party and invite their friends and some neighbours. This will help in bonding with the friends and neighbours and also the kids will enjoy sharing their addresses, phone numbers and email addresses with others, not least sharing their Facebook & Twitter details. This also helps them view their move in a positive manner.

    General advice

    1. When you are moving with children who are in school, make sure you move after the academic year is over. Moving in-between the years will stress the child more.
    2. Make sure you create an environment that is the same as the previous house for your children. This creates a feeling of security in the family unit.
    3. Always have some clothes, toys and food for the kids packed in a separate back-pack and carry it with you on moving day. This will be handy in situations where they get hungry or bored before you reach the destination or before you start unpacking in your destination.

  • Mattress Toppers & Protectors Explained

    Mattress topper or mattress protectors are detachable bedding that fixes on top of or encloses a mattress to protect it. Some mattress protectors also protect the person sleeping on the mattress from allergens and irritants such as dust mites, bed bugs, mold, and dead skin (like dandruff). This article outlines some popular types of mattress protectors and toppers along with their special features:

    mattress-topperPopular Types of Mattress Toppers

    Luxury Mattress Topper
    Luxury mattress toppers are comfortable, well manufactured and most notably affordable. They are filled with a luxurious polyester hollowfibre filling that retains its shape in order to provide your bed a constant extra layer of down-softness and lightness. Luxury mattress toppers are anti-allergenic treated, quality assured and certified. Their baffle walled cassette construction of ensures that they remains balanced throughout.

    Memory Foam Mattress Toppers
    If you are struggling for a good night sleep due to hip or back pain, you should seriously consider memory foam mattress toppers because they allow your bed to actually mould to your body by eradicating pressure points. Pressure points are basically areas on your body which press hardest into the bed. The extra thick memory foam allows your mattress pad to perfectly suit your body. The support of memory foam may also ease pain, tension, and headaches.

    Mattress Revivers
    Mattress revivers are hypoallergenic, nontoxic, chemical-free luxurious mattress toppers which provide extra comfort to your bed so that you can get a good night sleep. They are especially filled with an anti-allergen cotton-rich cover that contains sumptuous anti-allergy bi component hollowfibre to protect your body from dust mites and allergens and helping you to sleep well.

    Popular Types of Mattress Protectors

    Classic Mattress Protector
    Classic mattress protectors minimizes the wears and tears and stains to your mattress. What's more, they are the most popular types of mattress protectors due to their affordable price. The upper surface of classic mattress protectors is a high-quality polyester cotton fabric that contains a polyester hollowfibre filling. The skirt of classic mattress toppers is a non-woven elasticized fabric.

    Microfibre Mattress Protector
    Microfibre mattress protectors are non allergic mattress protectors which feature a soft peached microfibre cover which contains a plump and supportive hollowfibre filling to ensure breath ability and additional comfort so that you can enjoy a peaceful nap night after night. Microfibre mattress protectors are available in m,any sizes and designed to fit mattresses up to 30cm deep.

    Waterproof Mattress Protector
    Waterproof mattress protectors are most popular and highly-recommended type of mattress protectors which prolong the life of your mattress by keeping it clean, dry and fresh. They have a soft-touch surface with waterproof and breathable polyurethane backing that not only provides you a good night sleep but also protects your mattress from body sweat, water and other spills. Take Care of Your

    Mattress Toppers & Protectors
    Most of the mattress toppers and protectors come with a complete care instructions guide. Make sure you wash your mattress protectors by following the manufacturer's instructions on washing, drying and ironing. You can find these instructions on the packaging or on the labels sewn into the inside seam of each item.

Items 41 to 50 of 178 total

Page:
  1. 1
  2. ...
  3. 3
  4. 4
  5. 5
  6. 6
  7. 7
  8. ...
  9. 18